Christmas is the perfect time to showcase festive and beautiful nail art designs. From classic patterns to modern twists, there are endless options to choose from. Get inspired by the stunning Christmas nail art designs below and add a touch of holiday charm to your look.
Key Takeaways:
- Christmas nail art designs allow you to showcase your festive spirit.
- There are various styles to choose from, including peppermint candy pinwheels, jewel-toned nails, and modern mid-century designs.
- Cheerful cherry red snowflakes and dramatic gold stars are eye-catching options for your Christmas nails.
- Try elegant pink with gold detailing for a sophisticated holiday look.
- Silver and white winter wonderland and sweet gingerbread nails are perfect for creating a festive atmosphere.
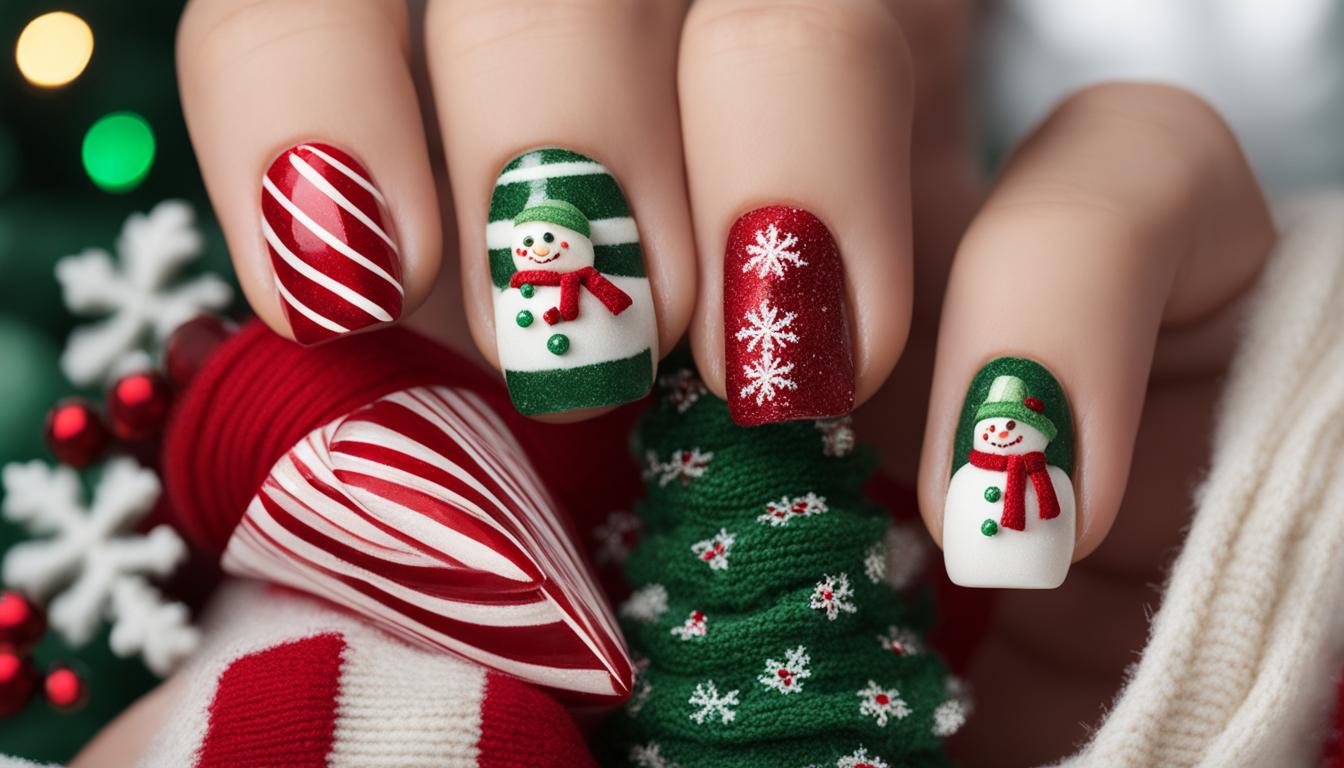
Peppermint Candy Pinwheels
Create a wow-worthy look with peppermint candy-inspired nail art. This design features pinwheel patterns in red and white, resembling the iconic peppermint candies. It’s a classic design that captures the spirit of Christmas.
To achieve this festive look, start by applying a base coat to protect your nails. Then, paint your nails with a vibrant red polish. Once the red polish is dry, use a white nail art pen or a thin brush to create the pinwheel patterns. Begin by drawing a small white dot in the center of your nail, and then draw diagonal lines extending from the dot to the edge of your nail. Repeat this process on all your nails to create a cohesive look.
Finish off your peppermint candy pinwheels with a glossy top coat to add shine and help your design last longer. This fun and playful nail art is perfect for the holiday season and will surely make a statement at any Christmas party or gathering. Embrace the festive spirit and show off your creativity with these delightful peppermint candy pinwheels!
Festive Jewel Tones
Embrace the holiday spirit with festive jewel-toned nails that will make a statement this Christmas season. These dazzling colors will add a touch of elegance and sophistication to your overall look.
Choose vibrant shades like emerald green, sapphire blue, and ruby red to create a striking and eye-catching manicure. These jewel-toned nails are perfect for both day and night events, adding a touch of glamour to any outfit.
Pair your jewel-toned nails with sparkling accessories to complete the look. Opt for gold or silver jewelry to complement the richness of the colors. Don’t be afraid to experiment with different nail shapes and designs to create a unique and personalized look.

Table:
| Jewel Tones | Color | Description |
|---|---|---|
| Emerald Green | Deep, lush green | Symbolizes prosperity and renewal |
| Sapphire Blue | Rich, royal blue | Evokes a sense of elegance and luxury |
| Ruby Red | Bold, vibrant red | Signifies love and passion |
Elevate your Christmas nail game with these stunning jewel-toned shades. Whether you prefer a single color or want to mix and match, the possibilities are endless. Get ready to turn heads and spread holiday cheer with your festive jewel-toned nails.
Modern Mid-Century
Add a touch of sophistication to your holiday look with a modern mid-century nail design. This chic and understated style incorporates clean lines and minimalist elements, creating a contemporary twist on classic Christmas nail art. Embrace simplicity and elegance with a design that will impress both fashion enthusiasts and design lovers.
To achieve the modern mid-century look, opt for a neutral base color such as nude or light gray. These shades will create the perfect canvas for the minimalist design. Use thin black lines to create geometric shapes, such as triangles, squares, or rectangles, on selected nails. You can also add a pop of color with a contrasting shade, such as deep red or emerald green, on one or two accent nails.
For an extra touch of sophistication, add metallic accents to your modern mid-century nail design. Gold or silver nail tape can be applied along the edges of the geometric shapes to create a sleek and stylish look. Alternatively, you can use a metallic polish to create small dots or lines within the design.
This modern nail art is perfect for those who appreciate clean and contemporary aesthetics. It’s a versatile design that can be paired with any outfit, whether you’re attending a holiday party or simply embracing the festive spirit. The modern mid-century nail design is a subtle yet stylish way to celebrate Christmas with a modern twist.
Cheerful Cherry Red Snowflakes
Add a pop of color to your Christmas nails with cheerful cherry red tips. Accentuate the look with delicate white snowflakes to create a festive and eye-catching design. The combination of vibrant red and icy white will instantly brighten up your holiday ensemble.
Whether you opt for a classic red manicure or a bold cherry red shade, this nail design is sure to make a statement. The addition of white snowflakes adds a touch of whimsy and captures the enchantment of a winter wonderland.
Create this cheerful cherry red and snowflake nail art at home with the following steps:
- Start by applying a clear base coat to protect your nails.
- Paint your nails with two coats of cherry red nail polish. Allow each coat to dry before applying the next.
- Using a white nail polish or a thin nail art brush, carefully draw snowflake designs on your nails. You can opt for simple snowflake shapes or more intricate patterns.
- Allow your nails to dry completely before finishing with a glossy top coat to seal in the design and add shine.
Table: Cheerful Cherry Red Snowflakes Nail Design
| Materials | Steps |
|---|---|
| Clear base coat | 1. Apply a clear base coat to protect your nails. |
| Cherry red nail polish | 2. Paint two coats of cherry red nail polish, allowing each coat to dry. |
| White nail polish or nail art brush | 3. Use white nail polish or a nail art brush to create snowflake designs. |
| Glossy top coat | 4. Finish with a glossy top coat for added shine and to seal the design. |
With this cheerful cherry red and snowflake nail design, you’ll be ready to embrace the festive spirit of Christmas. Whether you’re attending holiday parties or simply spreading joy with your dazzling nails, this design is sure to turn heads and spread cheer.

Dramatic Gold Stars
Add a touch of glamour to your Christmas nail art with dramatic gold stars. This stunning design features shimmering gold star nail stickers placed on a chic nude base, creating a striking contrast. The gold stars add a touch of elegance and luxury to your holiday look, making them a perfect choice for special occasions or festive gatherings.
To achieve this look, start by applying a nude polish as the base color. Once it is completely dry, carefully place the gold star nail stickers onto your nails. You can experiment with different placement patterns, such as clustering the stars near the cuticle or scattering them across the nail. Finish off with a clear top coat to seal the design and add shine.
The dramatic gold stars nail art is versatile and can be customized to suit your personal style. You can opt for a subtle look with just a few stars on one accent nail or create a bold statement by covering all nails with the dazzling gold stars. No matter how you choose to wear it, this design is sure to make your nails stand out and add a touch of festive glamour to your Christmas ensemble.
Tips for Applying Nail Stickers:
- Start with clean, dry nails to ensure the stickers adhere properly.
- Use tweezers or a small nail art tool to position the stickers precisely.
- Press down gently on the stickers to ensure they are securely attached to the nail.
- Apply a top coat over the stickers to extend their longevity and prevent them from peeling off.
With dramatic gold stars on your nails, you’ll be ready to shine bright this holiday season. Whether you’re attending a festive party or simply spreading holiday cheer, this glamorous nail design is sure to make a statement. So grab your gold star nail stickers and get ready to dazzle with your Christmas-themed nails.
Pastel Candy Cane French Tips
Add a twist to the classic French tip with a festive and timeless design inspired by candy canes. This nail art features pastel colors and delicate stripes, capturing the spirit of Christmas in a sophisticated way.
Start by applying a light green polish as the base color for your nails. Let it dry completely before moving on to the next step.
Using a thin nail art brush or a striping tool, create diagonal white stripes at the tip of each nail. Make sure the lines are thin and evenly spaced for a polished look.
To complete the candy cane effect, add thin red stripes alongside the white lines. Alternate between red and white to achieve the classic candy cane pattern.

Finish the look with a glossy top coat to seal and protect your festive nail design.
Elegant Pink with Gold Detailing
Embrace elegance this holiday season with a demure pink manicure adorned with exquisite gold detailing. This stylish and sophisticated design evokes the image of a festive ribbon, adding a touch of glamour to your Christmas look.
The soft pink base color creates a delicate and feminine backdrop for the gold accents, allowing them to truly shine. Whether it’s a subtle gold stripe or intricate gold patterns, the combination of pink and gold creates a luxurious and refined manicure that is perfect for any festive occasion.
“The combination of pink and gold creates a luxurious and refined manicure that is perfect for any festive occasion.”
Pair this elegant manicure with a glamorous evening gown or a chic cocktail dress to complete your holiday ensemble. The delicate pink and gold color palette adds a touch of warmth and sophistication to your overall look, making you the star of any Christmas party.
Silver and White Winter Wonderland
Transform your nails into a magical winter wonderland with silver and white nail art designs. These elegant and festive colors capture the essence of the holiday season, adding a touch of shimmer and sophistication to your look. Whether you prefer a subtle and delicate design or a bold and eye-catching pattern, silver and white nails are the perfect choice for a glamorous holiday manicure.
To achieve a silver and white winter wonderland look, you can experiment with various nail art techniques. Consider using silver glitter polish on a white base for a sparkly and glamorous effect. Alternatively, you can create a snowflake design using silver and white nail polish to emulate the beauty of falling snowflakes. Add some rhinestones or silver foil accents for extra sparkle and dimension.
For inspiration, take a look at the table below showcasing different silver and white nail art ideas:
| Nail Art Design | Description |
|---|---|
 |
Create a delicate snowflake design using silver and white nail polish. Perfect for a winter wonderland look. |
| Add a touch of sparkle with a silver glitter gradient. Start with a white base and gradually fade the glitter towards the tips. | |
 |
Elevate your manicure with a silver foil accent nail. Apply silver foil on one or two nails for a glamorous and modern look. |
These are just a few examples of the many silver and white nail art designs you can experiment with. Get creative and let your imagination run wild. Remember to finish off your winter wonderland manicure with a high-quality top coat to ensure your design lasts throughout the holiday season.
Sweet Gingerbread Nails
Indulge your sweet tooth with gingerbread-inspired nail art. While your gingerbread cookies are baking, paint your nails to match and achieve the ultimate cookie lover goals.
Create a deliciously charming look with gingerbread nail designs. This festive style incorporates warm, earthy tones reminiscent of freshly baked gingerbread cookies. With intricate icing details, candy cane stripes, and adorable gingerbread man accents, this nail art is the perfect way to showcase your love for the holiday season.
“I love how gingerbread nail art adds a touch of whimsy and nostalgia to my holiday look. It’s like wearing a little piece of childhood magic on my fingertips.” – Emily, nail art enthusiast
Whether you opt for a full gingerbread-inspired manicure or choose to feature gingerbread accents on a few key nails, this design is guaranteed to bring a smile to your face. Channel the cozy vibes of winter and let your nails be a delectable treat for the eyes.
Festive Snowflakes on Neutral Nudes
Combine the elegance of neutral nudes with festive snowflakes for a unique Christmas nail design. This look incorporates delicate snowflake patterns and cozy sweater knit motifs, giving a winter vibe to your nails. The neutral nude base provides a sophisticated backdrop, allowing the snowflakes to take center stage. It’s the perfect balance between understated elegance and holiday cheer.
To create this look, start by applying a base coat to protect your nails. Then, choose a neutral nude shade that complements your skin tone and apply two coats for full coverage. Allow the polish to dry completely before moving on to the snowflake design.
Using a thin nail art brush or a dotting tool, create snowflake patterns on each nail. Start by drawing a small cross in the center of the nail as the base of the snowflake. Then, add additional lines and shapes to complete the snowflake design. To give the design a cozy and wintery feel, you can also add some sweater knit motifs, such as cable knits or argyle patterns. Finish off with a top coat to seal the design and add shine to your nails.
With festive snowflakes on neutral nudes, you’ll have a chic and sophisticated Christmas nail design that is sure to impress. Whether you’re attending holiday parties or simply want to add a touch of winter magic to your everyday look, this design is a perfect choice. Embrace the holiday season and let your nails shine with this stunning snowflake design.
| Materials | Colors |
|---|---|
| Nail art brush or dotting tool | Neutral nude |
| Base coat | White |
| Top coat | Silver |

Top Tips for Festive Snowflakes on Neutral Nudes:
- Choose a neutral nude shade that complements your skin tone for a polished and sophisticated look.
- Practice your snowflake designs on a piece of paper before applying them to your nails for better control and precision.
- Add some sweater knit motifs, such as cable knits or argyle patterns, for a cozy and wintery feel.
- Apply a top coat to seal the design and add shine to your nails.
Abstract Christmas Trees
When it comes to Christmas nail art, why not go for something unique and eye-catching? Abstract Christmas tree nail designs are a fun and playful way to express your holiday spirit. With their colorful and whimsical patterns, these abstract trees will surely make your nails stand out at any holiday gathering.
To achieve this look, start with a neutral base color like beige or light gray. Then, use different shades of green, red, and gold to create abstract tree shapes on each nail. You can experiment with various nail art techniques, such as dotting tools or thin brushes, to create different textures and patterns. Finish off your abstract Christmas tree design with a glossy top coat for a polished and festive look.
Embrace your creativity with these abstract Christmas tree nail art ideas, and let your nails be the center of attention this holiday season. Whether you prefer a more minimalistic design or love to go all out with vibrant colors and embellishments, there’s an abstract Christmas tree design that will suit your style perfectly.
Holiday Nails: Glittery Stripes
Add a touch of sparkle to your holiday look with glittery striped nail art. This eye-catching design combines the festive charm of glitter with sleek stripes, creating a glamorous and trendy nail look that is perfect for any holiday occasion.
To achieve this stunning design, start by applying a clear base coat to protect your nails. Once dry, choose your preferred glitter nail polish and apply it to the entire nail surface. You can opt for classic silver or gold glitter for a timeless look, or experiment with bold jewel-toned glitters for a more vibrant style.
Next, create the striped pattern using a thin nail art brush or striping tape. Gently apply a contrasting nail polish color in straight, even lines across each nail. You can choose a complementary shade to your glitter polish, such as black, white, or a festive red or green. Once the stripes are dry, seal the design with a glossy top coat for a long-lasting finish.
“Glittery striped nail art is a versatile choice for the holiday season. It adds a touch of glamour and festivity to any outfit, and the sparkles catch the light beautifully.” – Nail Art Expert
Whether you’re attending a holiday party or simply want to elevate your everyday look, glittery striped nails are a stylish and fun choice. The combination of glitter and stripes creates a visually captivating design that is sure to make a statement.
| Pros | Cons |
|---|---|
| ✓ Adds sparkle and glamour to your holiday look | ✕ Requires precision and patience to achieve clean stripes |
| ✓ Versatile design that can be customized with different glitter and stripe colors | ✕ Glitter nail polish can be difficult to remove |
| ✓ Long-lasting with the application of a top coat | ✕ Can be time-consuming to create the striped pattern |
So, if you’re ready to add a touch of sparkle to your holiday nails, give glittery striped nail art a try. With its dazzling effect and trendy appeal, it’s a perfect choice for embracing the festive spirit.

Santa Hat Accent Nails
Add a touch of Christmas magic to your nail art with Santa hat accent nails. This playful and festive design will instantly put you in a jolly holiday spirit. Each finger gets its very own Santa hat, creating an adorable and eye-catching look that is sure to spark joy and delight.
How to achieve the Santa Hat Accent Nails:
- Start by applying a base coat to protect your nails.
- Paint your nails with a vibrant red polish as the base color.
- Using a white nail art pen or a small brush, carefully draw a triangle shape at the base of your nail to represent the Santa hat.
- Add a fluffy white line along the bottom edge of the triangle to create the fur trim.
- Finish off the design by adding a small dot of white at the tip of the triangle to represent the pom-pom.
- Allow the design to dry completely, and then seal it with a glossy top coat for a long-lasting finish.
With Santa hat accent nails, you can showcase your love for the holiday season in a fun and festive way. The design is versatile and can be customized to suit your personal style. Whether you prefer a bold and vibrant look or a subtle and understated design, Santa hat accent nails are sure to add a touch of Christmas magic to your manicure.
Emerald and Antique Gold Ombre Starry Night Skies
Channel the magic of a starry night sky with an emerald and antique gold ombre nail design. This captivating look is sure to be a showstopper at any Christmas cocktail party. The emerald green base fades into a shimmering antique gold, creating a stunning gradient effect that resembles the enchanting night sky. As the light catches the gold flakes, your nails will twinkle like the stars themselves.
To create this mesmerizing design, you will need emerald green and antique gold nail polish, as well as a makeup sponge. Start by applying a base coat to protect your natural nails. Once dry, paint your nails with the emerald green polish and allow it to fully dry. Next, apply the antique gold polish to the makeup sponge and gently dab it onto the tips of your nails, blending it with the green for a seamless transition. Repeat this step until you achieve the desired ombre effect.
“The emerald and antique gold ombre design is perfect for those who want to add a touch of glamour and elegance to their Christmas nail look. The combination of jewel tones and metallic accents creates a sophisticated yet festive design that will surely make your nails stand out.” – Nail Artist
Table: DIY Christmas Nails – Supplies Needed
| Supplies | Image |
|---|---|
| Emerald green nail polish |  |
| Antique gold nail polish | |
| Makeup sponge |  |
| Base coat |
Complete your emerald and antique gold ombre starry night sky nails with a glossy top coat to seal in the design and add extra shine. This elegant and eye-catching look is perfect for both formal and casual holiday events, and it pairs beautifully with a variety of outfits. Whether you’re attending a Christmas party or simply want to add a touch of glamour to your everyday look, this ombre nail design is sure to impress.
Conclusion
Celebrate the holiday season in style with these stunning Christmas nail art designs. From classic patterns to modern twists, there is something for everyone. Whether you prefer simple elegance or bold and festive designs, these nail art ideas will add a touch of holiday joy and charm to your celebrations.
Try one of these Christmas nail designs for a quick and easy way to elevate your look. You don’t need to be a professional nail artist to achieve beautiful results. With a few simple steps and some creativity, you can create festive nails that are sure to impress.
Get into the holiday spirit and showcase your personality with these Christmas nail designs. Whether you opt for peppermint candy pinwheels, jewel-toned nails, or a modern mid-century look, your nails will become a conversation starter and a festive accessory.
So why wait? Start experimenting with these simple Christmas nail designs and let your nails sparkle this holiday season.
FAQ
Are these Christmas nail art designs easy to recreate?
Yes! These designs range from simple to more intricate, so you can choose one that matches your skill level. There are also plenty of tutorials available online to help you achieve the perfect look.
How long will these Christmas nail designs last?
The longevity of your manicure depends on several factors, such as the quality of the nail polish and your daily activities. However, with proper application and care, these designs can last anywhere from a few days to a week.
Can I use regular nail polish for these designs?
Absolutely! Most of these designs can be created using regular nail polish. However, if you want a longer-lasting and more professional finish, you can opt for gel polish or visit a nail salon.
How can I make my Christmas nail art last longer?
To ensure the longevity of your Christmas nail art, make sure to apply a base coat before painting your nails and seal everything with a top coat. Additionally, avoid exposing your nails to harsh chemicals and wear gloves when doing household chores.
Can I mix and match these designs?
Absolutely! Feel free to get creative and mix and match elements from different designs to create your own unique Christmas nail art look. The possibilities are endless!
What tools do I need to create these designs?
For most of these designs, you will need basic nail art tools such as nail art brushes, dotting tools, and striping tape. You can find these tools at your local beauty supply store or online.
Can I incorporate these designs into acrylic or gel nails?
Yes, you can definitely incorporate these designs into acrylic or gel nails. Simply show your nail technician the design you want, and they will be able to recreate it using the appropriate materials.
How do I remove these Christmas nail art designs?
To remove these designs, simply soak a cotton ball or pad in acetone or nail polish remover and hold it on your nails for a few minutes. Afterward, gently rub the nail polish off with the cotton ball. It’s always a good idea to moisturize your nails afterward to keep them healthy.
Can I wear these designs for other occasions besides Christmas?
Absolutely! While these designs are perfect for the holiday season, many of them can be worn at any time of the year. Feel free to rock these festive and stylish looks for birthdays, weddings, or any other special occasion.
Can I customize the colors of these designs?
Of course! Feel free to get creative with the colors and customize these designs to match your personal style and preferences. Experiment with different color combinations and have fun!